Taming the Monster Mix
You can never have too much RAM, CPU Power, or too optimized a system. A basic computer-based studio will handle a basic DAW sequencer, like Cubase or Sonar; it will run the basic bundled plugins, plus some basic VST instruments, and 10 or 15 channels of audio. A powerful system will handle taxing convolution reverbs, multiple instances of heavyweight plugins like T-Racks or the Oxford suite, and monstrous synths like NI Massive, plus dozens of channels of audio. Especially when added together, those devices take a lot of processing power. Thus, even when you have that extra power, you tend to use it. Reaching the limits if your processor and RAM is almost always inevitable, no matter how powerful your system is. With this unfortunate fact unveiled, there are still a number of handy solutions to gain back your computer’s might and Hit Talk is here to help. Our expert staff explains how to use bounce and freeze techniques to minimize strain on your CPU, maximize the power of your DAW, make the most of your mixes, and open the doors to whole new levels of sonic creativity.
Bounce Audio & Midi Tracks
 The most conventional way to relieve strain on your CPU is to “bounce.” Bouncing is the process of reducing CPU load by rendering effects, instruments, or multiple tracks to a single mono or stereo track of audio, then eliminating the original sources of that audio from your DAW session. For example, if you’re mixing a drum part that consists of multiple audio and midi tracks using heavyweight effects plugins, bouncing to a single, mixed drum track gets rid of all those effect-laden tracks, significantly easing the burden on your CPU, and reviving the efficiency of your sequencer. That’s the benefit of bouncing. Compared to several tracks filled with numerous effects and instruments, a single bounced track of audio is a light burden.
The obvious disadvantage to bouncing is that it blocks any further changes to the sub-mixed audio within. Once you’ve saved a project with bounced audio, you’re committed to those changes. Hence, unless you’re planning on saving dozens of versions of a DAW project in case you need to revert or undo some aspect of your mix, a simpler solution is necessary. That solution is called “freeze.”
Freeze Audio & Midi Tracks
Freezing audio means bouncing it temporarily. When you freeze audio, effects, or midi, a track of bounced audio is created, and used as the source of audio. Hence, you still hear all your original audio, however the tracks, instruments and effects that the bounced audio came from are all “frozen” or disabled. Even though they are disabled, they remain in the project. This enables you to unfreeze those effects at any time, should you decide that you need to alter your multi-band compression, or your reverb’s late reflections, for example.
Several DAWs contain some kind of freeze function, but not all. If you’re using a DAW that can’t freeze tracks, you can purchase FX Freeze which is an extremely flexible freezing tool that saves your CPU bundles of power and grants you more choice and control for your tracking methods. Now we’ll take a deeper look at bouncing and freezing by showing you how it’s implemented in Sonar Producer Edition.
Bounce & Freeze Settings in Sonar
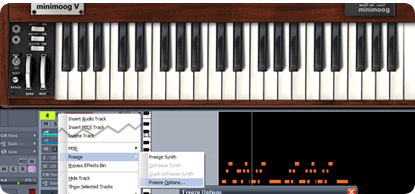
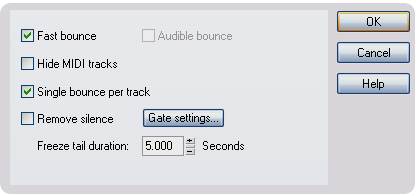
 In the first illustration (above), we’re using Cakewalk Sonar Producer Edition to produce a melody using a demanding combination of the Minimoog V, routed through a dense reverb, plus multiple stages of compression and EQ. If you click the above illustration, you’ll see the “freeze options” menu. You can open the “freeze options” menu by right-clicking the channel you want to freeze, and following the drop-down menu, as we’ve done above. For convenience, the freeze options menu is shown full-size at left. Sonar Producer Edition defaults to “fast bounce,” which means Sonar bounces the audio as quickly as your CPU will allow it to. Be careful with this function. Many hardware instruments and effect devices (and some software) can only process audio in real-time. Thus, fast-bounce can cause errors. If you’re not certain whether your software/hardware is compatible with fast-bounce, simply run a test, or leave the box un-checked.
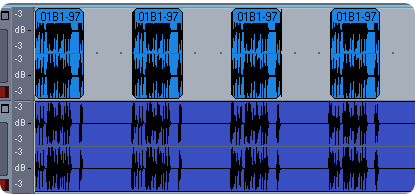
 “Single bounce per track” simply means the audio is bounced to a single clip. If, for example, one track contains several individual slices or clips, these are all consolidated to a single clip (see the lower track at left). Leaving the box unchecked results in the clips remaining separate (see the upper track at left). This is a useful function especially if you program beats by sequencing individual drum hits in multiple tracks (for example, the beat we created in “Widen Your Drum Beats“). By allowing the clips to remain separate, you’re still free to adjust their timing and rhythm by moving them.
The “freeze options” dialogue box also allows you to remove silence, and gives you the option to use a gate. This removes any silent areas in the track, which reduces the amount of hard disk space your project uses (especially if you’ve set your project at a high sample rate.) Also, if there is noise such as hum or hiss, setting this option to “remove silence” with the appropriate gate threshold settings will eliminate any noise in blank sections. Finally, adjust the freeze tail duration the same way you would adjust the release of a gate. If your reverb tail lasts roughly 5 seconds, make sure to set the “freeze tail” to match, so all the dynamics of your effects will be captured when you freeze your track.
Now that you know about bouncing, and in particular, freezing, you can’t blame your processor or your RAM for flat mixes. By freezing and bouncing your tracks, you can layer your mixes with thousands of samples and high-quality effects without beginning to touch the limits of your processor’s power. Of course, it’s always best to start with a powerful system over a basic system, since certain soft synths and effects can gobble resources even with a single instance loaded. Yet, whether your system is basic or powerful, you can liberate any DAW session. Empowered with the practice of bounce and freeze, you can afford to push the boundaries of your CPU without fear of limitation. Enjoy the freedom.


 GET 20% OFF COUPON INSTANTLY W/ SIGN-UP!
 Check Out Hot Artists & Music Producers discovered through Song Submit!


hey i have a dought
i have the anjurence u can help me
i got ur tribal xplosion loops and they are amazing..
but on ur demo sond u have some kicks that has a big low frequency sustain. how can i get them using neptunes drums for exemple? is it buy puting a 2nd kick drum, like u have in timabaland drums called bd0010? i use fl studio 8??
help me
Those sounds can be achieved by layering our Neptunian and Timbalicious kicks with 808 booms on the accent beats. Remember to tune all kicks to the key of the song, as this maximizes output and harmonics. You can find out about that in the free tips you get by signing up
Isn’t this Summing?
I use Logic on MacBookPro & iMac, the Macbook is a 4gig-rig with ‘matched low latency ram’, my iMac has only 1gig ram installed (I just ordered the same 4gigs).
On both macs I run into system overloads during high sample rates -96Khz…
I expected this from the iMac but not my super fast MacBookPro! The strange thing is - both computers has Intel Duo Core 2 processors (so aren’t I supposed to get double the process power/virtual memory, e.g 8 gigs in the macbookpro and 2 gigs in the iMac???)
A logic tutorial advised ’summing’ the tracks. I don’t remember if Logic has that option, but I was looking at summing amps and the info i received was just alot of science jargon.
If your advise is not about summing, then what the heck does the summing amp do?! lol. I am anxious to solve sample rate issues…
Ps.
I asked about word clocks and interfaces in a previous comment. I have a M-Audio 410 its supports up to 96Khz, but I haven’t had much success with the rates other than 48Khz. Do I need a clock to solve all this?
Tryin to keep that sound mannn! ;)
Hey TW,
You sum to a final master stereo (or mono) mix, you “bounce” to a track within a mix. Normally we’d say “I summed my mix to mono,” “I bounced all the drum parts to a single track.” If you look up the origin of the words, you’ll see the reasons for the difference. “Stem mixing” and “stem mastering” are related concepts you may also want to look up, but let’s stick to the topic.
“Summing” is what happens after you mix: you add together or “sum” the signals of each track of the mix. Because you have a clip indicator, you know that the sum of all tracks won’t be greater than your signal’s bandwidth (i.e., you won’t hear clipping) So, summing is synonymous with “mixing down.” After you’ve mixed, then you sum, then you’ve got a master.
Using a summing amp: say you’ve mixed in Logic, you route the individual channels and send them via the outputs of the FW-410 to the inputs of a summing amp, thus outsourcing the final mixdown to a piece of hardware, you’ll notice a perceptible improvement in sound quality.
—
are you running two hard drives; plus how big are the sessions?… If the 410 is compatible with 96KHz, you should have no trouble recording at that rate without a clock. Perhaps it’s something you can troubleshoot with Maudio.
Hi,
Thanx for clarifying that, those subjects weren’t so clear (including “stem mixing/mastering”), I see I’ve been doing these things off and on and didn’t know the process had a “name”.
I have 2 hard drives - but I haven’t been using the external (Lacie 500G) since reformating and data rescue to a new case. I’ve been recording, mixing, saving, etc… on my home internal drive(s). I know this is bad and I need a dedicated drive, but I couldn’t trust my data to a third external drive crash.
The size of the session(s) are on average 20mb - 200+mb. The largest I’m working on now is 500+MB, looks like the more Apple loops I use - the bigger the file size (I haven’t started vocal recording).
My productions aren’t overly crowded, on average 12+ tracks, When I start sequencing/mixing I use “Multi Output”, then add individual aux channels or duplicate tracks for separate processing with 3rd party vst’s. If the sample rate is higher than 41.Khz the CPU bar will jump considerably, I try the low latency tab, but no results I’m satisfied with. I’d like to compose in 96 Khz but its not happening.
I purchased the 410 two yrs ago and have not figured this out, I guess I’ve associated the problem to not having enough ram.
Ultimately, my quality has suffered and if I don’t get results soon- I’ll upgrade. But, I’ll ask M-Audio first and let you know what they say. - thanx
Hi guys,
I ran several test with the memory upgrade and changed the settings on Buffer size vs sample rate (A positive improvement on system usage, but not as stable as I’d like).
M-Audio’s board suggested a OS X update and latest 410’s driver, I did so and there are still drop outs and overloads. Logic Pro site states that “computational power” is also a necessity with higher sample rates (88.2 khz+) and mentioned PCI/PCIe systems handling a lower buffer size and latency under 128 samples.
I have all the memory my iMac and Macbookpro can handle, I figure I should get a PCIe card, but which card vs which hardware add on’s seems tricky.
Any suggestions?
Thanks again…
Terrance,
Have you looked into any of Universal Audio’s UAD series? And are you thinking of a PCI-e card as a replacement for your FW interface?
Yes, I found a new beauty. Just shipping…
-UAD-2 Solo/Laptop, network card. It offers identical UAD-2 (pci) card power. So I’ll get that sample rate boost I need to step my game up!
About the FW interface, I need a more portable rig for my MacBookPro.
I want something that’ll offer the connivence of the FW 410 setup.
I noticed - Apogee’s Duet. But, my concern is subwoofer monitoring.
The FW 410 has outputs for a possible surround playback, I don’t see how I’m gonna use my KRK 8’s and (if desired) a sub -in future upgrades.
-Your thoughts….?
a small mixer with the requisite outputs is the first thing that pops to mind… but part of what’s nice about the duet is its compactness, so you might be disinclined to split the outputs of the duet’s breakout cable by using another gizmo… have you looked at the Edirol FA-66? It’s a little bigger, but it’s red! Here, try this link
Funny, thats what I was going to get b4 the FW 410, That red is killin it though…
Yea, I think I could dish out several more bucks for the Duet. didnt even think about a splitter– doh!
thanks all the valuable info, you guys rock!
Great website and great information. You are very knowledgeable about this topic and i can’t wait until we come back and visit your website again!