Audio Phase Inversion Toolbox
Phase inversion is a subtle, yet versatile music production tool capable of many distinguished feats. First, what is phase inversion? Inverting a wave’s phase means swapping the location of its peaks and troughs. This creates cancellation when peaks of one wave coincide with the troughs of the other wave, like in this article’s thumbnail on the Hit Talk main page. Here are 3 creative uses of this valuable production technique:
1: Eliminating Audio Hum Using Phase Cancellation
Hum in the signal can come from multiple sources, but one of the trickiest to deal with is noisy guitar pickups. Especially when distorted, single-coil pickups can emit a loud hum, and correcting that hum using a noise gate can wipe out soft dynamics. A clever solution is recording just the pickup hum on an independent track for the duration of the guitar peformance, then inverting the phase of the channel containing the hum. This will eliminate most of the hum, provided the peaks and troughs line up.
2: Create a Wider Stereo Mix by Inverting Phase
It’s also possible to widen a mono sound by converting it to stereo, then feeding some of the left channel (out of phase) to the right, and feeding some of the right channel (out of phase) to the left side. Sound on Sound magazine details this process in an article on improving your stereo mix, and also provides a diagram illustrating how this can be accomplished using a mixer. This is a fantastic, yet subtle means of pushing peripheral song elements to the very edges of your stereo image. Though this is an important technique, particularly if you’ll be summing your mixes to mono, we’re saving our step-by-step instructions for our final technique: one that is vital in the realm of Hip Hop and Rap music production.
3: Isolating Song Parts with Phase and EQ
This last tip expands on Eric Lowry’s advice from the Hit Talk comments in “Compress Hip Hop Beats“. Thanks again, Eric, for the valuable contribution. Remix artists, and producers often rely on samples from previous recordings, or sometimes from other recording artists. Often those samples contain desired instrumental parts mixed in with undesired instrumental parts. Let’s say for the sake of illustration, you want to sample the hi-hat and treble percussion from a song, leaving out the bassline and kick drum. You’ll be
 supplying the bass elements in your new, much-improved song. In theory, you could use resonant filters to knock out the undesired parts, but we’ll show you a technique that gives you infinitely more control over which sounds you take from a pre-recorded sample, and which sounds you exclude.
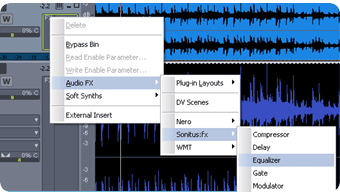
 1) Create two tracks of identical audio: Your goal is to retain the treble percussion without hearing any of the bass. The first step is to load the song sample you’ll be working from into two audio tracks, as we’ve done at left in Sonar 8 Producer Edition.
2) Assign an equalizer to track 1: In the left-hand diagram, we’ve activated the Sonitus equalizer that comes bundled with Sonar 8. If you’re following the steps, simply left-click the track 1 fx menu, and then follow the drop down menus. So, now you have two identical channels of audio, one with an EQ, one without.
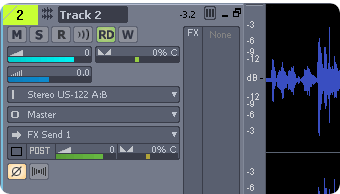
 3) Invert the phase of track 2. Before making any changes to the equalizer you’ve assigned to track 1, first invert the phase of track 2. At left, is the expanded track view of track 2. You can open the expanded track view in Sonar by clicking on the “expand window” box just above the track 2 fx menu (currently empty). Once you’ve expanded track 2, click the phase invert button in the very lower left-hand corner. Just to the right of the phase button is the gray stereo/mono selector button. Make sure both track 1 and track 2 are both set to stereo (Sonar might default to mono on track 1). Now track 2 is 180 degrees out of phase with track 1. Now, when you press play on the Sonar transport panel, you should hear nothing.
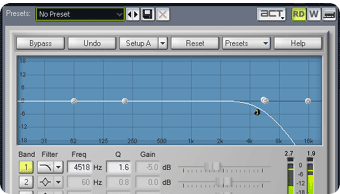
 4) Carve out the desired frequency range So far, you’ve achieved complete audio cancellation. Now you’re free to carve out the frequencies that you want to hear. Effectively you’re using the EQ in reverse. At left, we’ve set the equalizer to lowpass, with a cutoff of 4kHz. Now those frequencies cease to cancel, and the treble percussion and hi-hats can be heard in isolation of the bassline. You can also experiment by sweeping a narrow bandpass back and forth at -5dB.
Now, you may be wondering “why not just use a highpass filter?” Fair question. The reason? When you follow these instructions, you start from 0dB (something you cannot do with most parametric EQs, even if you set their output to -24dB). Furthermore, a highpass filter that isolates the highest frequencies will prevent you from hearing anything below the cutoff frequency. If you follow our instructions above, and use a lowpass instead, you’re free to include any frequences that lie below the cutoff frequency, letting everything else cancel completely. So, for example, you could use 2 or 3 narrow bandpass filters to pick up some of the lower frequencies of the treble percussion while keeping the rest of the mix absolutely silent. Though you can never completely separate the instrumental parts of a finished song that’s been mixed to stereo, this technique gives you a precise tool for slicing out the frequency spectrum with surgical precision.


 GET 20% OFF COUPON INSTANTLY W/ SIGN-UP!
 Check Out Hot Artists & Music Producers discovered through Song Submit!


That was very helpful. Thanks
how make it differnet between big record lable and small how can u adversite ur product and beignner in the music buiness ans wat state of equipment will i have too start with and how do i get start in this field and also how do i go about too earn my own record label do i have too artist first or just production music………well i like ur program very interested and educated indeed
Yo Everton, don’t get ahead of yourself… You don’t need to make huge investments starting out. A demo of Live plus some of ModernBeats’s free audio samples (scroll down below the “enter site” button and enter your email) might be a good, quick way to start flexing those creative muscles… Then if you become a professional, the type of equipment will vary depending on what kind of work you do. Recording and producing requires a suitable environment, and the right equipment. We cover that all in our music production ebook. For straight beatmaking, if you can break into advertising markets for example, software and a midi controller are sometimes all you need to make it work.
welcome, Finest… (:
Hi Hit Talk Staff!
I’ve recently been reading up on Audio Engineering & the use of different frequencies as well as sound masking in music. In regards to this article you have written I was wondering, is it possible to expose the underlying sounds beneath this sound masking? I would be very interested in learning how to isolate backing vocals & rhythms for analysis. Please get back to me it would be very much appreciated :)
how do i make sure dat my vocals stand out in my mix and i still get to hear every instrument played?
@brainzee I’ve not been producing long but i think i can offer a bit of help. If u want ur vocals to stand out in the mix, you need to think of the frequency ’space’ ur instuments take up. Vocals usually sit in the upper reaches of the spectrum, for example, 5000Hz - 15000Hz. (use a spectrum analyser to see where the vocals are peaking) if you have other instruments occupying this space, then they are going to compete for space (and obviously one will lose out) Use EQ to cut the instrument tracks by 2-4dB at the area where the vocals peak. Do the same for instruments (find the peaks using a spectrum analyser) and this time cut the vocal track in the respective areas. The cuts will be inaudiable, but it will create space for the vocals to shine through, as well as the instruments at their optimal frequencies. Try to avoid boosting as this uses up vital headroom needed for the mastering stage. For a better explanation, read up on creating space in the mix. Hope this helps